
My Adventures with Sourdough Bread
By Marjorie Buessing
Sourdough Bread is alive. Each and every loaf is unique. It is affected by its environment. Temperature, altitude, humidity, timing and everything can make a difference in your loaf of sourdough bread. At the same time, this bread is resilient. Think of it, when our west was young the chuckwagon on every cattle drive carried sourdough starter to make the bread to sustain the hard working cowboys. I find that sourdough adapts to the rhythm of my life. I love the science of it, the chemistry. Changing different variables and checking to see if I like the outcome.
Since I started my adventures with sourdough bread I have come across sourdough fanatics. I encourage you to not fall into this way of life. Remember a couple things:
1. This is fun!
2. You are the subject not the sourdough!
I got started because my daughter and her daughter (4 years old) made their sourdough starter from scratch. It’s just flour and water, a little attention and 2-3 weeks. She then shared some bread with us! Yum! Then she gave me some of her starter. Since then I have read a number of books and watched some youtube videos on sourdough but if I had started with those I never would have started at all because it seems so complicated and all the directions make two big loaves. It’s just too much for a retired couple to handle.
It helps to have a mentor when tackling any adventure life gives you. I had my daughter who is one of the busiest people I know. Not only was she the mom of two active little girls when she gave me my starter but she works full time as an economic analyst and is a principal in her firm. My other mentor is a young woman at my church, Claire Martinez, who is the wife of a firefighter and the mother of four very active boys. These two women lead crazy busy lives and yet they made sourdough bread. This gave me the encouragement I needed to try. Both have encouraged me and shared their tips and recipe variations with me.
The easiest way to get started is to find someone who has sourdough starter and when they feed theirs take their discard home and feed it to have your own. I will admit I named my sourdough starter. I named her after my paternal grandmother, Rhoda Albinia Crabb. However I am the subject in our relationship. She has spawned quite a number of offspring for my neighbors and friends. Next month I will be taking some with me in my checked luggage to Massachusetts so I can bake sourdough bread there for my son’s family. That will be another chapter of this adventure as my sourdough lives at the altitude of 5,000 feet and will be moving to sea level. I’m excited to discover what a difference that will make.
How to care for your starter:
Equipment:
You need a clean clear wide mouth glass canning jar with a lid. (My jar is 2 quart but I suggest you start with a one quart jar)
A kitchen scale that reads in grams.
A good flexible spatula that easily reaches to the bottom of your jar.
Ingredients:
Sourdough Starter, it doesn’t take much starter to get started because now you feed it and it will naturally grow. I’m going to assume you are starting with a cup of starter but if you have less, no problem, just feed it until it grows to the amount you want to have.
Filtered water at room temperature.
A good all-purpose organic unbleached flour.
Feeding:
With your sourdough starter in your jar, put the jar on the scale and turn it on to read zero. Now add 60 grams of filtered water and 60 grams of all-purpose flour. (This is usually about ½ a cup) Give your starter a good stir and scrape down the sides of the jar. Put the lid on loosely and set it on your counter. It is fun to put a rubber band around the outside of the jar at the level of the starter. In 2 and 4 hours your starter should have risen, look bubbly and have a nutty sour smell. It’s alive!
Feed your starter every day until you have about 11/2 or 2 cups of so. If you have a 1 quart jar you don't want to put more than 2 cups of starter in it because of the expansion after each feeding.
Important:
After you have the right amount of starter for your breadmaking adventure, everytime you feed your starter your first step is to take 60 grams of starter out before you add the 60 grams of water and flour. This is called Sourdough discard. This discard is the reason Sourdough Bread is referred to as Friendship Bread. If you're like me you hate waste. I just don’t like it when I have to throw the discard out. I love it when I have someone to give it to. I also have some good recipes that use it for flavoring. Note: If you are throwing your discard out, do not put it down your garbage disposal, put it in the garbage can.
The rule of thumb I use is:
When I’m using my starter and I’m in the baking mood Rhoda stays on the counter bubbling away and I feed her once a day, and when I’m not in the baking mood she stays in the refrigerator in a state of dormancy and she gets fed once a week. Recently we went to Peru for 3 weeks. While I was gone our friends Jim and Poppy Richie visited our house once a week. Poppy watered my plants and Jim, who is an accomplished baker himself, fed Rhoda and put her back in the refrigerator.
Making Sourdough Bread
My recipe makes one loaf and takes about 20 minutes to make but that 20 minutes is spread out over 3 days! Just relax and enjoy the process:) Note: I developed this recipe for Loveland, Colorado which is 5,000 feet above sea level so you may need to adjust it for your location. Just jump in and try it then make changes. Treat it like an experiment in chemistry if you liked science or think of it as a creation of beauty if you loved art or it can be both. I love the bread in the Netherlands, a crusty artisan whole wheat loaf with lots of flavor, however Richard prefers a lighter loaf so I make both. Be creative and have fun with it.
Equipment:
Your kitchen scale
Your good flexible spatula
The perfect sized medium bowl, not metal (My favorite one can hold 3 quarts.)
Clean dish cloth
Tiny bowl for kneading water
Good counter or other surface you can knead bread on
Parchment paper
Dutch oven (Cast Iron or LeCreuset work well.)
Razor blade
Ingredients:
Sourdough Starter
Filtered water at room temperature.
All purpose organic unbleached flour.
Bread flour, I use a good organic artisan bread flour
Whole wheat flour, again use a good brand of organic flour
Kosher salt
Instructions:
The night before I’m going to start a loaf of bread I take Rhoda out of the refrigerator and let her warm up to room temperature overnight.
Day 1:
Either before or after breakfast I feed Rhoda. (Take 60 grams out and discard, add 60 grams filtered water and 60 grams all purpose flour and stir. Leave your starter on the counter all day.)
Either before or after dinner and at least 2 hours before bed put your dough together. In a medium non metal bowl and using your scale mix together:
60-75 grams sourdough starter
350 grams filtered room temperature water
500 grams bread flour*
10 grams kosher salt
I add everything to the bowl and stir all this together until there are no more really wet spots or clumps of flour. Your dough won’t look like dough you’ve seen before. It should look messy and ragged and that’s okay. Just cover the bowl with a clean warm damp cloth and set it aside until just before bed.
* This step is where you can choose what kind of bread you want to make. I usually mix half bread flour and half whole wheat flour. Richard likes it when I use all the bread flour. I do recommend using at least half bread flour when you use rye flour or a nut flour for the other half. Go wild!
At this point if you're not making more bread tomorrow, put your sourdough starter back in the refrigerator until you want to make more bread or for a week when it will need to be fed.
3. Before bed knead your bread in the bowl. (I had never heard of this before!) Take that tiny bowl and put some filtered water in it. Wet your fingers and pull the dough from the edge up over itself. Work around the bowl as you keep wetting your fingers and pulling the dough up over itself. I go around about twice real quick. Now it should look more like dough but a bit wetter. Sourdough likes a bit of water. Invert your ball of dough in its bowl and cover it with the cloth again and go to bed.
Day 2
Either before or after breakfast put a couple handfuls of all purpose flour on your counter or other surface for kneading. Dip your fingers in the flour and work around your dough to loosen it from the bowl. Dump the dough out on top of your flour. Sprinkle with a little flour if it’s sticky. This is not kneading like I have done before because sourdough isn’t speedy like baker’s yeast bread. Sourdough needs time to work. To knead, pull and work the dough into a nice rectangle shape, then fold a third from one end over the middle and brush excess flour off, then fold the other end over the first third. Turn the dough sidewise and repeat this stretching and folding process one more time. If it’s hard to stretch into a triangle just let it rest for 5-10 minutes and come back to it. Cover with the cloth that is dry now and let it rest and rise for an hour or two on the counter. ( I like making bread on days when I have laundry or chores or meetings. It fits easily into any schedule.)
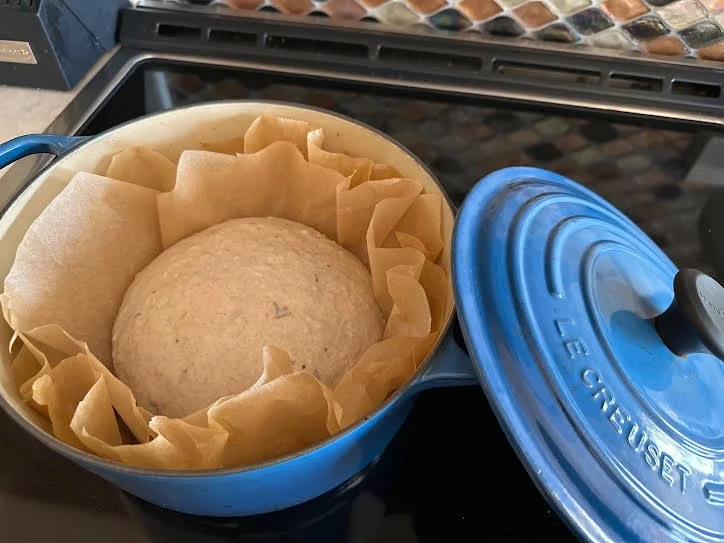
In an hour or two, Clean out the bowl and put a sheet of parchment paper in it. Knead the dough again like before. After the second turn lift the dough off the board and work it with your hands into a nice ball tucking the edges under and inside. Brush off excess flour as you go. Put the dough into the bowl atop the parchment paper and cover with the towel.
About 2 hours later pull the towel off and cover the dough directly with saran wrap, loosely ducking the edges around the dough. Put the bowl in the refrigerator to proof until the morning. Here you are slowing down the process which develops the sour taste more and shaping your loaf. Most recipes suggest proofing for at least 4 hours and not more than 24, however I have proofed for only 30 minutes a couple of times.
Day 3
First thing, pull the dough in the bowl out of the refrigerator and take off the saran wrap. Cover with a towel and give it an hour to come to room temperature.
Get your dutch oven out. Carefully lift the dough out of the bowl by opposite corners of the parchment paper and place it gently in the dutch oven still in the parchment paper. Let it rest and rise for an hour with the lid on.
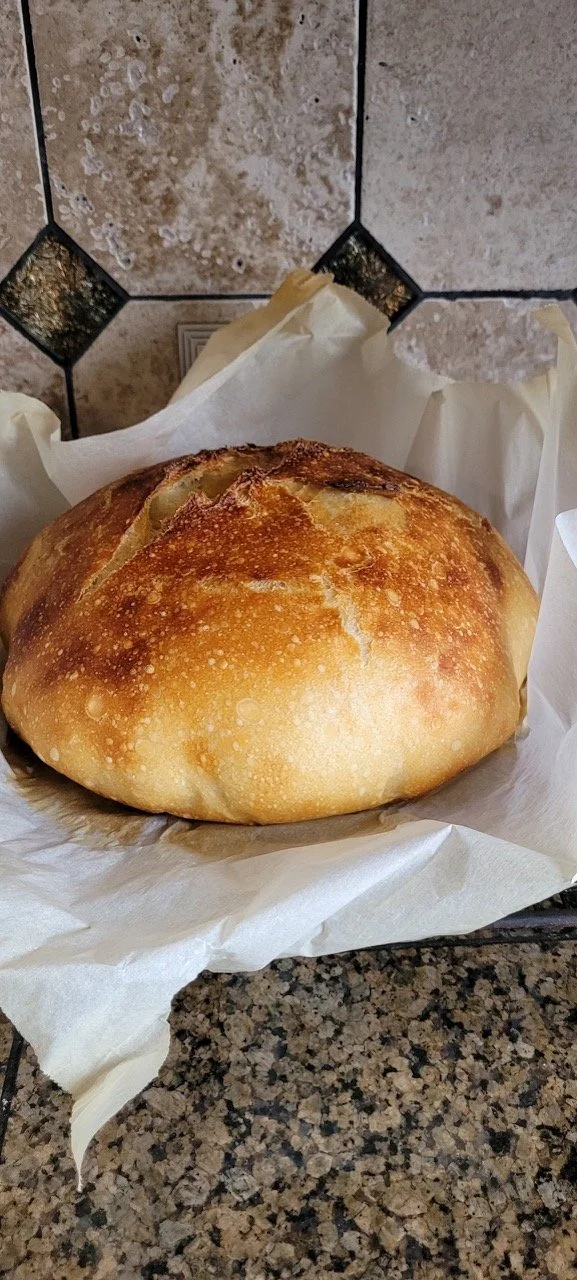
Turn the oven on. Most recipes call for 450 degrees but for my oven I use 430. When the oven is ready, lift the lid on your dutch oven and with your razor blade make at least 3 slits. Put the lid back on the dutch oven and slide it into the hot oven for 40 minutes. Note: I didn’t have a razor blade for a while and used my finest paring knife. I Do Not suggest that. It is hard to cut the dough and go ½ inch deep and it doesn't look as nice. I got my razor blades and holder for under $10 on Amazon and love it. Most come with suggestions for designs and you can get creative.
When the 40 minutes are up, open the oven and take the lid off the dutch oven but leave the bread in there for 7-10 minutes more. You may give the dutch oven a turn to ensure even baking. My first recipe said 20 minutes more but that was too much.
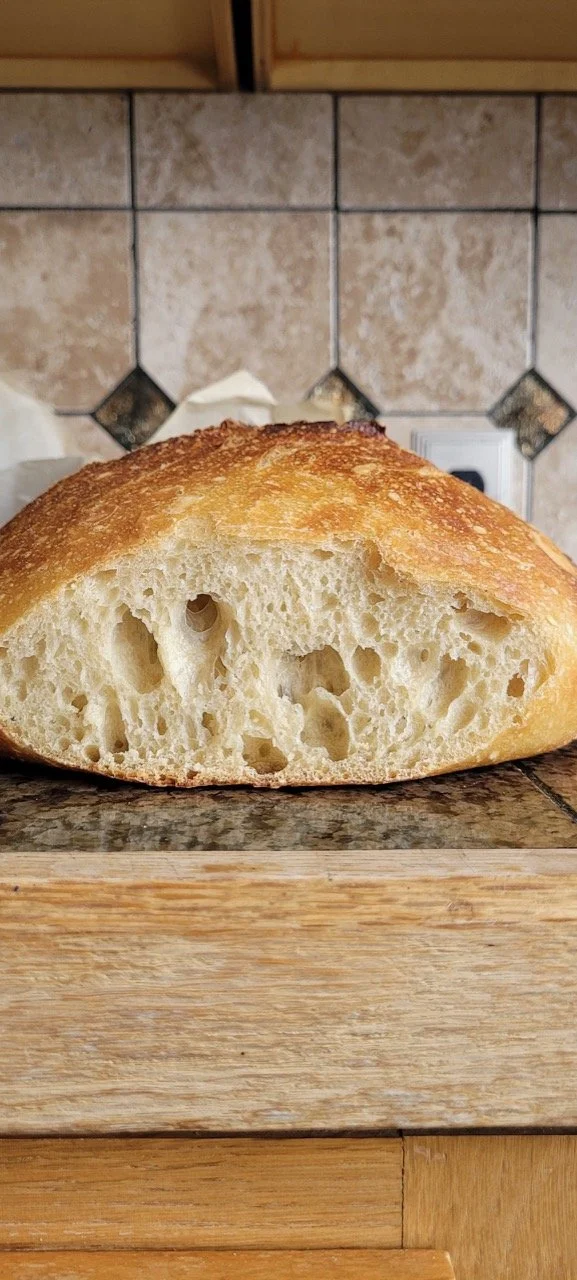
When it’s done, use the parchment to lift it from the dutch oven. Pull the paper off and put your loaf on a wire rake to cool for at least 11/2 hours before cutting it. This is the most difficult step! (I put my used parchment paper back in my dutch oven and just bake the next loaf on top of it. I usually have 2 pieces of parchment paper under the new one I’ve proofed my new loaf in.)
I leave my bread on the cutting board with the cut side down and cover it with a dish cloth. Richard is very good at slicing the bread for us. Usually I find someone to give bread to and it is gone in a couple days or we invite someone over for homemade soup and toast. If we still have part of a loaf on the third morning Richard slices the remaining loaf and I put it in a freezer bag and into the freezer. Then we pull a slice out as we need it and pop it in the toaster. This way if I go somewhere to help with grandchildren Richard can still have his sourdough bread.
If it starts to get stale, cut it into cubes and freeze it to be toasted in the oven with your favorite herbs and spices and a little EVOO for 12-15 minutes at 350 degrees for delicious croutons.
If you want to get really creative once you have a good loaf you may want to try these ideas:
Cranberry Walnut Bread from Claire: Add 250 grams craisins and chopped walnuts. She soaks the cran-raisins in a little pure vanilla to soften them. When you do the first kneading in the bowl just toss some cranberries and walnuts in each time and pull the dough over them until they are all in. The surface will sometimes open up due to the add-ins but just go with it.
Rosemary (or dill) Onion Bread: Add ⅓ cup dried onion flakes and 2 T finely chopped fresh Rosemary or Dill. Add these as you knead the dough the first night in the bowl and continue with the recipe.
WARNING:
Sourdough Bread can be addictive and catching! I now have my younger sister, Judy in Montana making sourdough bread. Not a week goes by or a phone call that we don’t share some new discovery about our adventures. She now also makes a loaf every week for her grandchildren. For Christmas all our neighbors got sourdough bread for their gift too!
Sourdough Discard Flat Bread for Two
For those of you who hate waste.
Combine together:
60 grams Sourdough starter discard (unfed)
35 grams lukewarm filtered water
75 grams all-purpose flour
¼ t salt
⅛ t active dry yeast
Mix for about 5 minutes and add a little more water if it’s too dry. Place in a lightly greased bowl for 2-4 hours to rise to double.
Drizzle pan with EVOO and brush to coat the pan. Put the dough on the pan and let it rest 15 minutes, then press it flat. If it isn't cooperating let it rest for 5 minutes and continue. Let it rise to where you want it. (We like ours very thin.)
Turn the oven to 450 degrees.
While it heats add the seasoning and toppings you like. The last one I made I simply brushed it with EVOO and put garlic, onion, peppers, mushrooms with salt pepper and italian seasoning.
Bake for 15 minutes and add cheese. Mozzarella and/or Parmesan work well. Bake 5 minutes more to melt.
Wait 5 minutes and cut into 4-6 pieces.
Richard found a great article about the health benefits of sourdough bread.